Magic Renova Manual Kit
Expert Advice
Industry Leader
Safe for Natural Stone
About the Product
Guide
Reviews
Magic Renova Manual Kit
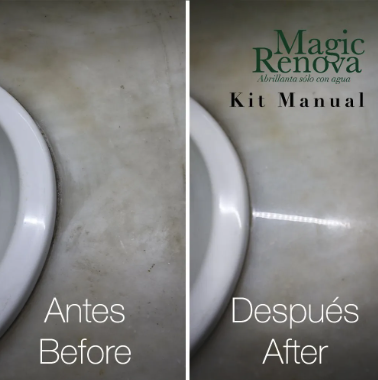
Restore and polish marble, travertine, and limestone with the Magic Renova Manual Kit. This tool-free solution removes stains and etch marks while rejuvenating stone surfaces without specialized equipment.
Easy to Follow Instructions
This kit includes step-by-step instructions that are color-coded, ensuring that you’ll be able to achieve a glossy mirror-like finish with an amazing anti-slip shine, even when the surface is wet.
It’s like magic! Perfect for giving your marble, travertine, limestone, and terrazzo surfaces a much-needed facelift (please note: not suitable for granite surfaces). Works like a charm on lighter stones!
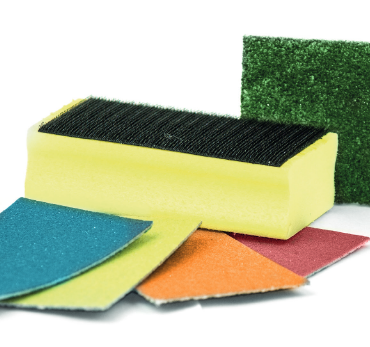
Color Coded Pads
Each pad in different colors represents a specific step in the process, making it a breeze to achieve the exact results you desire. Just remember to use fresh, clean water with each step of the way.
And hey, if you need to repeat the process in certain areas, go ahead! Our kit is here to make your life easier after all. So get ready to restore the beauty of your surfaces with the Magic Renova Manual Kit – you’ll be amazed at the incredible shine it brings!
Directions for Using Magic Renova Manual Kit
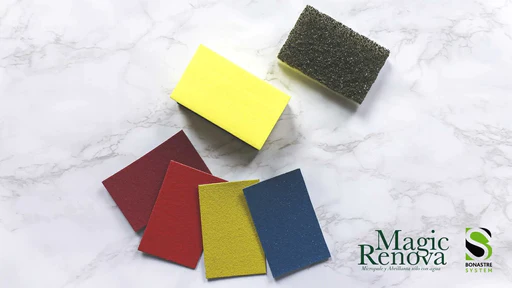
- Red is for resurfacing. It removes surface stains and scratches, including acid stains.
- Orange is for preparation. It refines the surface for intense shine.
- Yellow is for polish. Using the yellow pad will achieve a matte or satin gloss.
- Blue is for intensify. It intensifies the surface brightness.
- Green is for super glossy. You use the green pad to generate a super glossy finish, the last step in the process.
Key Features of Magic Renova Manual Kit
- Tool-Free Application: Designed for manual use, eliminating the need for drills or power tools.
- Versatile Use: Ideal for countertops, vanities, tables, stairs, and other small or hard-to-reach areas.
- Eco-Friendly: Requires only water for the polishing process, promoting an environmentally conscious approach.
- Professional Results: Achieves a smooth, polished finish, restoring the stone’s natural beauty.
| Kit Component | Description |
| Red pad | Initial abrasive pad for removing etch marks and minor scratches. |
| Orange pad | Intermediate pad for refining the surface post-red pad treatment. |
| Yellow pad | Further smoothens the surface, preparing it for final polishing. |
| Blue pad | Prepares the stone for the final high-gloss finish. |
| Green bonastre pad | Delivers the ultimate polished, glossy appearance. |
| Handheld Velcro Pad Holder | Facilitates easy attachment and use of polishing pads. |
| Step-by-Step Instructions | Provides clear guidance for optimal results. |
Note:
- Coverage: 10 to 13 sq. ft. Coverage may vary depending on the type of surface and condition.
- For larger areas use the 5″ Magic Renova Drill Kit.
- NOT FOR USE ON GRANITE.
- We cannot guarantee any results due to several factors that can effect the results you achieve with this kit.
- Bonastre items are not part of any sales discounts or promotions including but not limited to free shipping, shipping discounts, and sales.
Directions:
- Place the #1 abrasive on the hand holder.
- Spray clean water on the surface.
- Scrub the area, applying pressure in a circular motion, and repeat until the damage has been removed, and have an even finish.
- Clean and dry the surface.
- Repeat the process with #2. (This abrasive will remove the scratches from the previous abrasive.)
- Repeat the process using the #3 abrasive, twice. (With this step, you will start to see some shine.)
- Use #4 as many times as needed to achieve the desired shine.
- Finish with the green pad to achieve the maximum gloss.